Summary
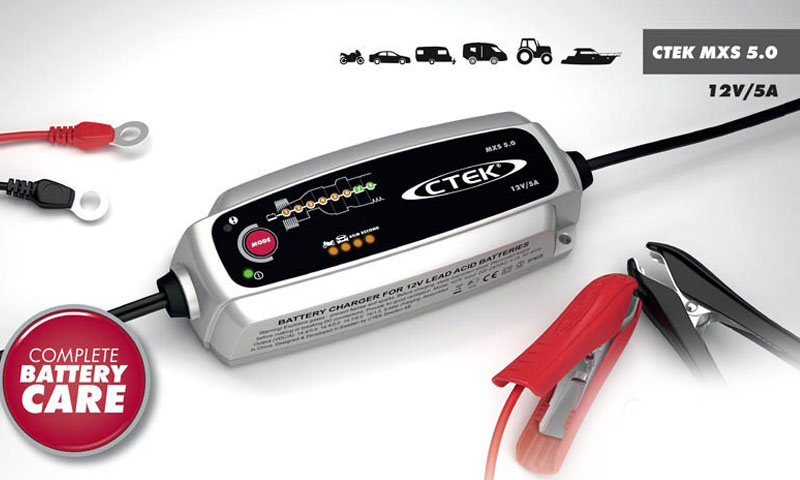
Product Name : CTEK MXS 5.0 with temperature compensation
Function : 12V Vehicle Battery Charger /Conditioner
Price : GBP 58
Where to get it : Amazon.co.uk (where I got it)
Ease of use : ***** (very easy)
Warranty : 5 years (return to manufacturer)
What’s in the Box : Charger, alligator clips, eyelet connector, manual, storage bag.
Quick recommendation : Recommended, you should keep this charger at home or in the car
Why it is recommended to have a portable car battery charger at home
Vehicle batteries are charged every time the vehicle’s engine is running. The alternator will charge the battery at 13.8 to 14.4 volts. Nevertheless, with this standard in-vehicle charging, the battery will deplete over time which will limit its usable lifetime.
An external charger (such as this CTEK MXS 5.0 portable car battery charger) can do a better job with more functions and higher voltage, such as desuplhation and reconditioning processes (at 15.8 V, which is significantly higher than the in-vehicle alternator charging).
This higher voltage, together with pulse voltage /current can give a significant help to remove sulphate from battery plates, which is the most common cause of battery depletion. This is one of the main features of an external charger. There are 8 available steps for the charging which will help improving battery condition.
More over, battery capacity will decline when a vehicle which is not driven for some time (a few weeks or months). An external charger can help revitalize the vehicle battery.
Many reviews on websites seem to praise this charger. We’ll see if it deserves to be the best car battery charger we need.
Some significant information:
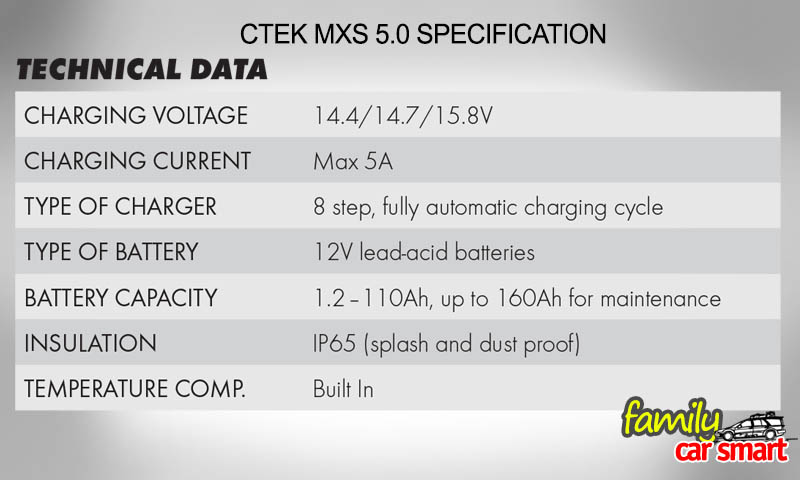
Target battery: 12 V motorcycle battery (1.2 – 14 Ah), car /AGM battery (14-160Ah). Not for 6V or 24V batteries.
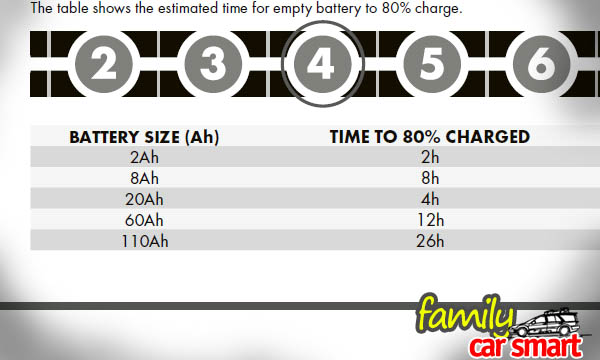
Time to charge to 80% capacity from empty (battery ready for use, entering step 4 in the charging phases): as the following table.
Charger Specification:
Available functions:These are the functions available from the CTEK MXS 5.0 charger with temperature compensation:
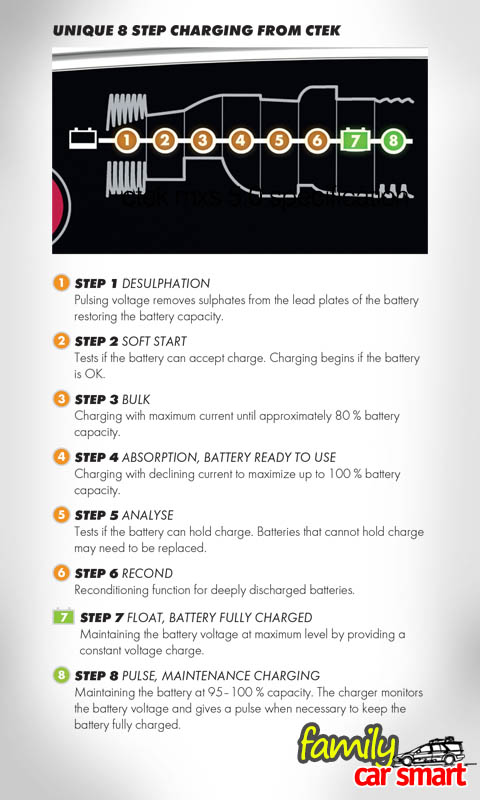
These are the steps that will run on the CTEK MXS 5.0 charger with temperature compensation:
We shall keep in mind that a lit step lamp means the process is underway and the previous process is considered completed /not required. The following descriptions refers to the CTEK manual.
The first process (step 1) is desulphation, which removes sulphate from battery plates, which will improve battery capability to accept charge. This is done through a higher charging voltage than what a car alternator does.
Then a soft start (step 2) follows. In this phase, it charges and probes whether the battery can accept full charge. Step 1 and step 2 take a maximum time of 8 hours.
The third phase (step 3) is bulk charging. This is the maximum current charging at increasing voltage to 14.4 V charging the battery to 80% capacity. This may take as much as 20 hours.
When the battery reaches 80% capacity, the battery is ready for use. Charging enters step 4 with constant voltage at 14.7 V and declining current to bring the battery to full capacity. The time required is a maximum of 8 hours.
After step 4 is completed, an analysis (step 5) begins, where the charger checks whether the battery voltage does not drop to 12 V. This is a test whether the battery, even after sulphate is removed, can really hold charge. If it does not, maybe it is time to replace the battery. The required time is only 3 minutes.
A reconditioning phase (step 6), an optional process, may follow thereafter. In this phase, a reconditioning occurs by mixing the battery acid (by using a higher voltage of 15.8 V that creates gassing).
Step 7 (float charging) and step 8 (pulse charging) are the phases to help maintaining the battery capacity at full level.
Not all these steps must be completed to get the battery for use. After step 4 is completed, the battery should be ready for use. Total time required before the battery is ready for use will vary according to conditions.
These are the steps according to the manufacturer. Our test (part 2 of this review) will tell how the charging occurred.
Instruction for use, according to the charger manufacturer:
How to use the charger (for negatively earthed battery):
1. Park the vehicle in a well-ventilated area. Avoid open flames, lighted cigarette near the battery.
2. Connect the charger red clamp first to battery positive pole.
3. Connect the black clamp to vehicle chassis away from fuel lines and the battery.
4. Plug the charger to a wall socket.
5. When charging is completed, remove the plug from the wall socket before disconnecting clamps from the battery.
5. Remove the black clamp first before the red clamp.
For positively earthed battery:
1. Park the vehicle in a well-ventilated area. Avoid open flames, lighted cigarette near the battery.
2. Connect the red clamp to vehicle chassis away from fuel lines and the battery
3. Connect the black clamp to the battery negative pole.
4. Plug the charger to a wall socket.
5. When charging is completed, remove the plug from the wall socket before disconnecting clamps from the battery.
5. Remove the red clamp first before the black clamp.
Before using the charger, please read thoroughly the CTEK MXS 5.0 Charger manual and your vehicle manuals concerning safety precautions.
For information on the actual charger we received and tested, see part 2 of this review here.

Hello
Love the information that you have on your website and this article and
very useful to have the graphics
Thank you for such a nice informative website
best regards – Paul
Thank you Paul. I certainly hope it would be useful for any car owner, even though the test result was not really satisfying.